Hi Guys,
Welcome back to another blog post!! June holidays are now over, that just means, some form of regularity will be resuming back:)
The month of May plus June Holidays was so much fun for me
and my family.
This week's post is about me sharing with you an easy way, I found to
save me some time in the mornings when I need to rush and look "ok". I am talking about the extra coverage for the bags under my eyes, acne prone and blemished skin.
I was not able to hurry about slapping
foundation on my sleepy face and rush out the door. No can do:(
After experimenting with a few busy mornings, I now have a
quick method for a quick face routine. Surprisingly, I am using affordable concealing products
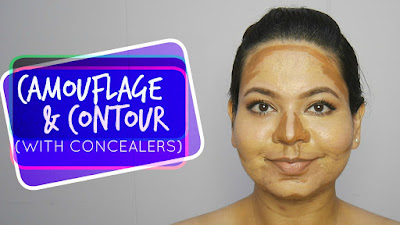
to camouflage wherever I need an extra layer of security for coverage and sneak in some depth and dimensions on my face. Think slimmer.
The L.A.Girl Pro. Conceal HD.High Definition Concealers are available to us in a wide range of shade selections with variable undertones, I’d say a huge
plus for me.
Being Asian, I have medium complexion with deep yellow undertones
and usually have trouble with matching shades from most well-known Drug Store Brands. They're either pink tinted or very ashy on me.
I got my concealer fix from a local online Blog shop, Coma
Makeup. Their customer service crew are highly attentive to my requests, equipped with quick
delivery.
I had tried filming this look before with the three concealer shades, I purchased (Toast, Medium Beige and Pure Beige) and it turned out to be a disaster. I am clearly not a pro yet, at blending out the dark and neutral shades at the same time. For some reason, I ended up crossing over the lines and, it was "not pretty".
I had tried filming this look before with the three concealer shades, I purchased (Toast, Medium Beige and Pure Beige) and it turned out to be a disaster. I am clearly not a pro yet, at blending out the dark and neutral shades at the same time. For some reason, I ended up crossing over the lines and, it was "not pretty".
Since the weather is super hot, no way am I layering any products without a face primer. I switch between a few of my favorites, I have been liking the NYX Angel Veil Primer. Glad to know that it's oil free.
This time, I knew better. I used “Toast” sparingly on areas
like the parameters of my face to tone down my giant forehead, slim down my
rounded cheeks, fake a slimmer nose and hide those extra pounds peeking from
under my jaw line.
With a damp Real Techniques Miracle Sponge, I was able to stick to the areas that needed blending, this took the edge off.
With a damp Real Techniques Miracle Sponge, I was able to stick to the areas that needed blending, this took the edge off.
The concealers went applied directly onto the face, from the
tube; I felt it was too much product overload, the first time. On the second attempt, I
dispensed the shades “Medium Beige” and “Pure Beige” on to the back of my hand
and gave it a few swirls, then use the damp sponge to pick up little product at
a time and blend it into my skin wherever necessary.
This reduced product overload and blending appeared to be seamless. The finish was semi-matte and it looked much cleaner than the first try.
This reduced product overload and blending appeared to be seamless. The finish was semi-matte and it looked much cleaner than the first try.
To set the contour in place, I used a cool toned
brown shade from the Australis Highlighting & Contouring Kit (the middle
shade, from the bottom row)
For the rest of the face, I swept across a big powder brush
with the Rimmel London Long Lasting Stay Matte Pressed Powder (001
Transparent)
For an everyday subtle glow, I used a fan brush to pick up the two lighter shades from the E.L.F Warm Bronzer to dust the tops of the cheekbones.
A fairly easy way to look fresh and Summery this
Summer!!
I hope you enjoyed this week's
blog post, come back for more!
Head on over to my happy place at
the YouTube platform to watch my step by step tutorial on this technique.
Please Subscribe to show your support and I will see you next week!
Lots of Love,
_________________________________________
♥♥♥ Find me here!!!! ♥♥♥
Instagram: shanthiarumugam
Twitter: Shanthi Arumugam
Facebook: Shanthi Arumugam-Vimalan
Spotify: Shanaru6
Snapchat: shanaru6
Roposo: shanthivimalan


No comments
Post a Comment
If there are any video requests for me, please drop me a message below. Thank You!!